Best Driveway Alarm
Updated December 8th, 2019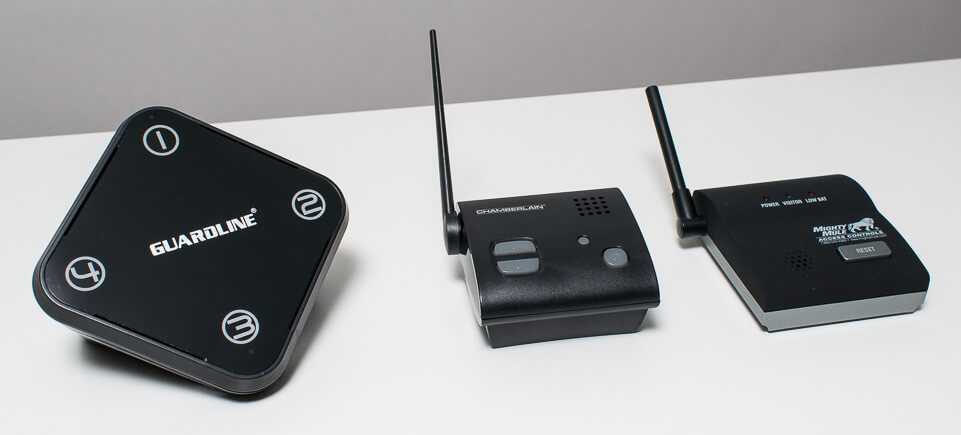
You just installed your brand new driveway alarm. A few hours go by and your first visitor arrives, or so you think. The alarm beeps. You look outside and no one’s there. A few minutes later the alarm goes off again. You look outside again. Nothing there.
Frustrated, you go back through the alarm’s manual, checking that you installed it correctly. No problems there. You check all of the systems components. No problems there. So what exactly is the problem? The alarm was likely triggered by motion that shouldn’t have triggered it – like a moving branch or small animal – a false alarm.
You read the manual again trying to see if there’s a way for you to make adjustments to the system to eliminate this type of false alarm. A few minutes later, you realize there are none. You’re stuck with a driveway alarm that can’t be adjusted and beeps for moving tree branches.
We're here to help
The above scenario is exactly what we want to try to help you avoid as you try to find the best driveway alarm for your particular application. We’ve done the legwork researching and testing all of the most popular driveway alarms on the market. Our analysis resulted in picking three systems that stand above the rest as the three best options for most users. And you can rest assured that all three of these systems can be adjusted to reduce their susceptibility to false alarms to help you avoid the scenario we described above.
These three systems are the best systems in terms of range and adjustability, expandability, installation difficulty, day to day ease of use, and durability.
What exactly did we look for in each of these five categories when evaluating not just these three systems but all the most popular systems on the market?
What exactly should you be looking out for when choosing which driveway alarm you should buy? We discuss that next.
Features
Make an informed purchase. These are the features you should look out for when shopping for a driveway alarm.

Range
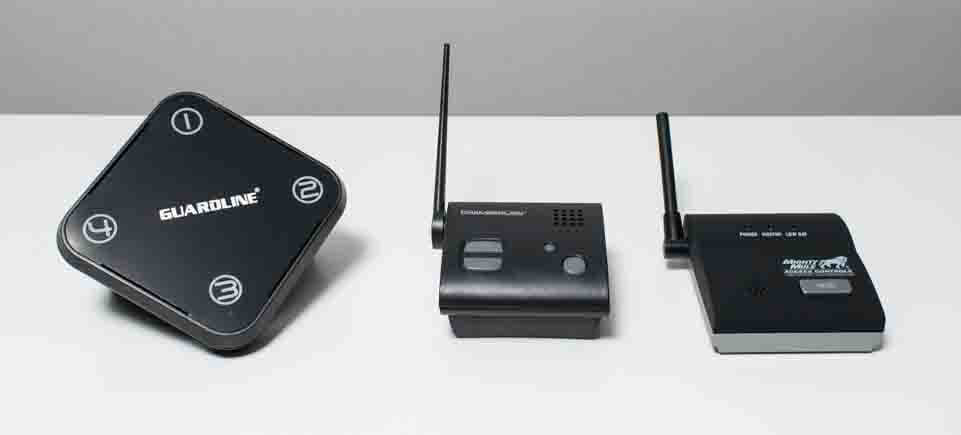
A driveway alarm consists of two parts:
sensor
detects motion - a vehicle, person, or animal passing in front of it
receiver
receives signal when the sensor detects motion and beeps, chimes, and/or flashes a light to alert the user that the signal has been received – that motion has been detected by the sensor
We define a driveway alarm’s range as the maximum distance you can put between the sensor and receiver before the receiver will stop receiving signals from the sensor reliably.
What do we mean by “reliably”? Well, most manufacturers give a driveway alarm’s maximum range but fail to specify under what conditions the given range is functional.
You see, that maximum given range is immediately reduced the moment you put even the smallest obstruction in the path of the signal the sensor sends to the receiver.
Planning on keeping the receiver indoors? The maximum given range of the alarm is immediately reduced even if you plan on putting the receiver right by your front window. That window is still an obstruction! Other obstructions include trees, buildings, walls, and any change in elevation.
So, how do you know the true real world range of the driveway alarm you want to buy? Well, that’s where we come in. We’ve surveyed actual customer experiences using all of the most popular driveway alarms on the market to determine their actual range in real life scenarios. We’ll go over our survey results in the reviews that follow further down below.
Adjustability
Earlier we described a driveway alarm as having two parts – a sensor and a receiver. Whether these two parts will work at all is determined by the distance you put between them – the range of the system.
Put the sensor too far away from the receiver and the system simply will not work or if it does work (maybe at a slightly closer range), will work very unreliably - the signal the sensor sends to the receiver may be properly received by the receiver only one in ten times, for example.
So, the system’s range effectively determines whether it will or won’t work at all.
The system’s adjustability, on the other hand, will determine how well it works when it works (when both units are within proper range).
What do we mean by “how well it works”?
For one, how well a driveway alarm system works is often determined by how susceptible it is to false alarms. What if you set up your system and find that it gives a million false alarms detecting things you don’t want to detect? A highly adjustable system will allow you to limit false alarms.
Second, how well a driveway alarm system works is determined by whether it detects what you actually want to detect.
Remember, you’re buying a driveway alarm to detect one, two or all three of the following three things:
- Vehicles including cars, trucks and motorcycles
- Human beings
- Animals
What happens if you want your system only to detect vehicles? What if you only want to detect foot traffic? What if you want to detect vehicles and human beings but not animals?
In all of these scenarios, system adjustability comes into play.
Now, not all systems on the market have equal adjustability. In fact, we found that only a few systems were highly adjustable. Many were only slightly adjustable and some weren’t adjustable at all.
Highly adjustable systems allow you to fine-tune your system to limit false alarms and get the exact detection you want or need.
Systems that cannot be adjusted or feature poor adjustability will do the opposite – they won’t allow you to fine tune them to limit false alarms and they may or may not give you the detection you want or need.
You may be asking, “what exactly is there to adjust?” Here’s a list of adjustments that can be made on some of the top units we recommend.
Sensor sensitivity
adjust how sensitive the sensor is to moving objects. Use this adjustment to fine-tune the system to only detect vehicles or also detect foot traffic and/or animals.
Sensor range
adjust how far away from the sensor motion will be detected. Turn it up if you want the sensor to pick up motion far away from it and turn it down to limit detection to the width of the driveway – this adjustment will greatly reduce false alarms.
Speed
adjust how fast the detected object needs to travel for the sensor to send a signal to the receiver. This adjustment can be used in conjunction with the sensor sensitivity adjustment to fine-tune what type of objects you want the sensor to detect – only fast moving objects or only slow moving objects or both.
The above three adjustments all work together to allow you to
- Greatly reduce the frequency of false alarms and
- Only detect what you want to detect
Expandability
You may be tempted to skip over this section. After all, you only need one sensor and one receiver right?
Maybe not.
You see, expanding your system to include more than one sensor and/or receiver isn’t only necessary if you have multiple driveways or a large complex property.
Let’s go back to talking about how well your system works and what you can do to make it work better. Earlier we noted how you can improve your system’s performance by adjusting it. The more adjustable the sensor, the more precisely you can fine-tune it to detect only what you want it to detect and limit false alarms.
But what if you want to improve your system’s performance even more? What if you want to be absolutely sure that it’s going to detect motion 100% of the time?
The answer – buy and install a second sensor. By placing two sensors in your driveway instead of one you essentially double your chances of being alerted when motion is detected.
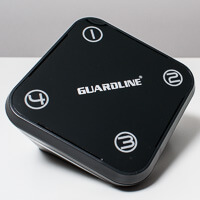
Adding one or more sensors to the system has several other benefits as well. For one, it greatly increases its versatility. The top rated Guardian GL2000 driveway alarm allows you to set a different chime for each sensor paired to the receiver.
This allows you to fine-tune one sensor to only detect vehicles and another to only detect foot traffic. One chime (corresponding to the first sensor) will let you know when a vehicle has entered your driveway while another (corresponding to the second sensor) will let you know that a human being is on your property.
This is about future proofing
We need to make it clear that we’re not saying that you need to buy any additional sensors right now. What we are saying is that you may very well want to do so some time in the future. And when you do, the system you buy needs to allow for additional sensors and needs to operate efficiently with multiple sensors enabled.
To evaluate the expandability of all of the different systems we researched and tested we asked the following three questions:
- Can more sensors be added to the system?
- How easy is it to add more sensors?
- How well does the system work with multiple sensors enabled?
Installation Difficulty
You want the driveway alarm system you buy to be easy to install. Installation for most systems will involve the following four steps:
- Installing batteries in the sensor (and sometimes the receiver)
- Pairing the sensor to the receiver
- Mounting the sensor
- Testing that the system is operating correctly
How easy is it to complete each one of these individual steps? This is what we evaluated when comparing the installation difficulty of all of the driveway alarms we researched and tested. You might be surprised to hear that we found some systems to be a lot easier to install than others.
General Ease of Use and Day to Day User Experience
Once your driveway alarm is set up and properly installed you’re going to use it, every day. What is that experience like? To evaluate day to day user experience we looked at the following:
-
The chime/beep that sounds when motion is detected and more specifically,
-
the loudness of the chime
It’s crucial that you’re able to hear the chime when it sounds. This is, after all, the whole reason you’re buying a driveway alarm to begin with – to hear a chime when someone or something passes through your driveway. Interestingly, we found some systems to have a very soft chime when activated. Other systems allowed us to turn up the chime volume well beyond what would be necessary even for a 5000+ sq. ft. home.
-
whether the chime can be adjusted and how it’s adjusted
Some driveway alarms have a horrible sounding chime when they’re activated. Others have a more pleasant sounding chime. Some even allow you to change the sound of the chime altogether.
-
-
Real world battery life for the receiver and especially the sensor
Sensor battery life varies between 6 months and 2 years for all of the systems we tested. Systems with sensors with better battery life were scored better in this category.
-
Whether there’s a low battery indicator when the sensor batteries run low and how well it works
The sensor’s batteries will eventually run out of power and when they do the sensor won’t work. You want to be sure that you’re alerted when the batteries run low so this won’t happen.
-
Whether the receiver can fall back on battery power if necessary
All receivers plug into AC power but not all of them can fall back on battery power when the power goes out. Systems that feature receivers with battery backup functionality were scored better in this category.
Durability, Warranty and Customer Support
To assess the durability of each system we looked at the build quality of both the receiver and the sensor and all of their internal parts. We also evaluated the weather resistance of the sensor included with each system.
To assess the included warranty we primarily looked at warranty duration but also studied the terms of each included warranty. Systems with better warranty terms were scored better in the category.
To assess the customer support included with each system we surveyed consumer reviews and specifically looked for comments by users who had contacted customer support. Was the experience positive or negative? How easy was it to get in touch with support? Were there multiple means of contact (phone and email or just one or the other)? These are the types of questions we asked to evaluate the customer support included with each system.
Top 3
Our reviews for the three best driveway alarms on the market.

Guardline GL2000
Range and Adjustability
Range drop off
After surveying a plethora of customer reviews, we observed a disturbing trend - a substantial drop off in actual real world range compared to manufacturer specified range for almost all driveway alarms currently on the market. Surprisingly, the reported percentage drop off for all systems was very similar as well – likely due to the fact that they all transmit signals via radio waves using similar frequencies.
With no obstructions (direct line of site) we found the maximum reported real world range to always be very close to the manufacturer specified range no matter what system we evaluated. Adding a few obstructions (a small patch of trees and a slight change in elevation) dropped the range of most systems by approximately 40%. Adding even more obstructions (greater tree density, a greater change in elevation, and a small shed) dropped the range by an additional 20% for a total drop off of 60%.
The Guardline GL2000’s range
The range drop off percentage for the Guardline GL2000 was generally reported to be no different than it was for most other driveway alarms we surveyed.
The GL2000’s maximum manufacturer specified range is 500 ft – confirmed to be true with no obstructions in according to consumer reviews.
With minimal obstructions most users saw the range drop to about 300 ft. (40% drop off). With a lot of obstructions the system’s maximum range was reported to drop to approximately 200 ft (an additional 20% drop off).
These results can be summed up in the following table:
| Obstructions | Max. Range |
|---|---|
None |
Approx. 500 ft. |
Minimal |
Approx. 300 ft. |
High |
Approx. 200 ft. |
If you need a system with a range greater than 200 to 300 ft. we recommend that you consider the GL2000’s big brother – the Guardline GL5000. The GL5000 is almost identical to the GL2000 except that for the fact that it has more than double the range. Here’s a breakdown of the GL5000’s real world range.
| Obstructions | Max. Range |
|---|---|
None |
Approx. 1300 ft. |
Minimal |
Approx. 800 ft. |
High |
Approx. 500 ft. |
We have only one reason for giving the GL2000 the nod as the best driveway alarm over the GL5000: Price. The GL2000 is normally available for about $100 while the GL5000 retails for about $160. Since both systems are almost identical except for range, we felt the $60 savings in going with the GL2000 over the GL5000 would be worth it for most users since most users won’t need the increased range. This is the reason why the GL2000 is our top pick and not the GL5000.
That being said, if you do need a system with a range greater than 200 to 300 ft. the GL2000 simply won’t be an option for you and you’ll have to pay the extra $60 or so to get the GL5000.
With the above information in mind, note that the rest of this review will apply not only to the 500 ft. range Guardline GL2000 but also to the ¼ mile range Guardline GL5000.
Adjustability
The Guardline GL2000 is by far the most adjustable driveway alarm on the market today. It’s exceptional adjustability is probably the #1 reason it earned its spot as the #1 driveway alarm we recommend for 2018.
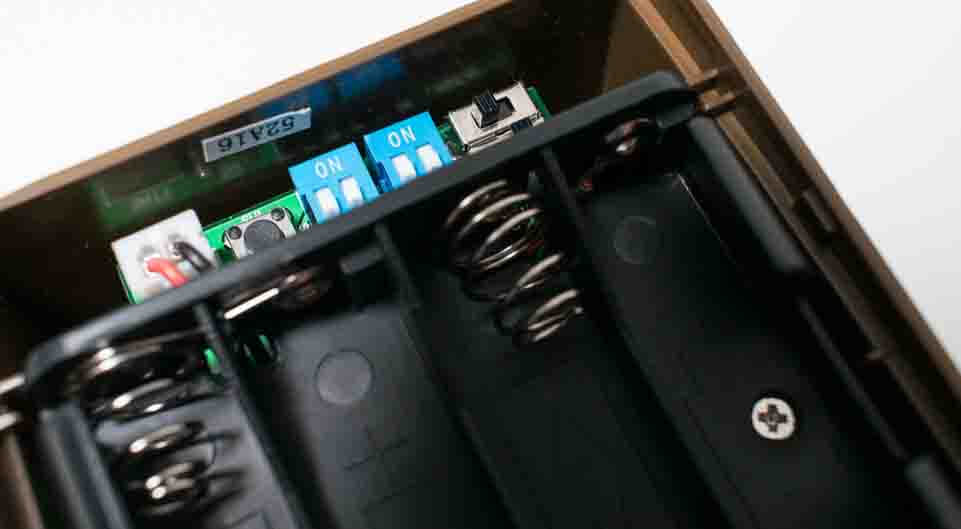
Both the system’s sensor and receiver are adjustable. The sensor features the following adjustments:
Sensor range (distance sensitivity)
can be set to 39 ft., 26 ft., 23 ft., or 13 ft. Adjusts how close the motion needs to be to the sensor for it to detect it. For example, if set to 26 ft. the sensor will only detect motion up to 26 ft. away from it.
Speed sensitivity
can be set to 1.5 – 3 ft./sec. (only detect slower movement) or 3 - 6.5 ft./sec. (only detect faster movement).
Night mode
can be set to on or off. When turned on, the sensor will only work in the dark. When turned off, the sensor will work at all times.
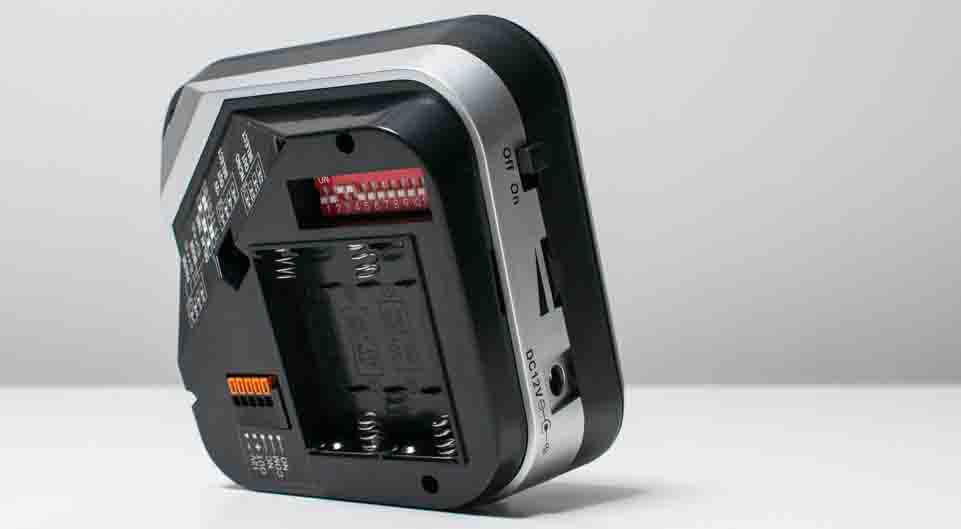
The system’s receiver features the following adjustments:
Pause time setting, pause mode, delay time setting, output terminal, 12V output control, and NO/NC control.
Expandability
The Guardline GL2000 is a highly expandable driveway alarm system. We give it top marks in this category for the following three reasons:
1. One GL2000 receiver can be paired with up to 16 different sensors. Most other systems have receivers that can only be paired with up to 8 sensors.
2. Each sensor added to the GL2000 system can be assigned its own unique sounding chime (there are 32 different “songs” or sounds to choose from). Most other systems do not offer this functionality.
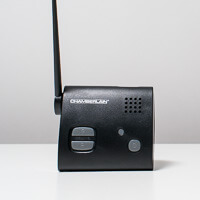
The very popular Chamberlain CWA2000, for example, plays the same chime no matter what sensor paired to the system is activated. The only way to distinguish which sensor is activated with the Chamberlain system is to listen carefully to the number of times the chime repeats itself. The number of times it repeats corresponds to the sensor that’s activated. For example, if the receiver beeps 5 times then sensor 5 is activated. If it beeps only one time then sensor 1 is activated, and so on and so forth.
With the GL2000 you can have a unique melody play for each sensor that’s activated. This allows you to know the exact sensor that was activated the moment the melody starts playing.
3. Each sensor, added to a GL2000 system, can be assigned a zone. There are 4 zones available and up to 4 sensors can be assigned per zone.
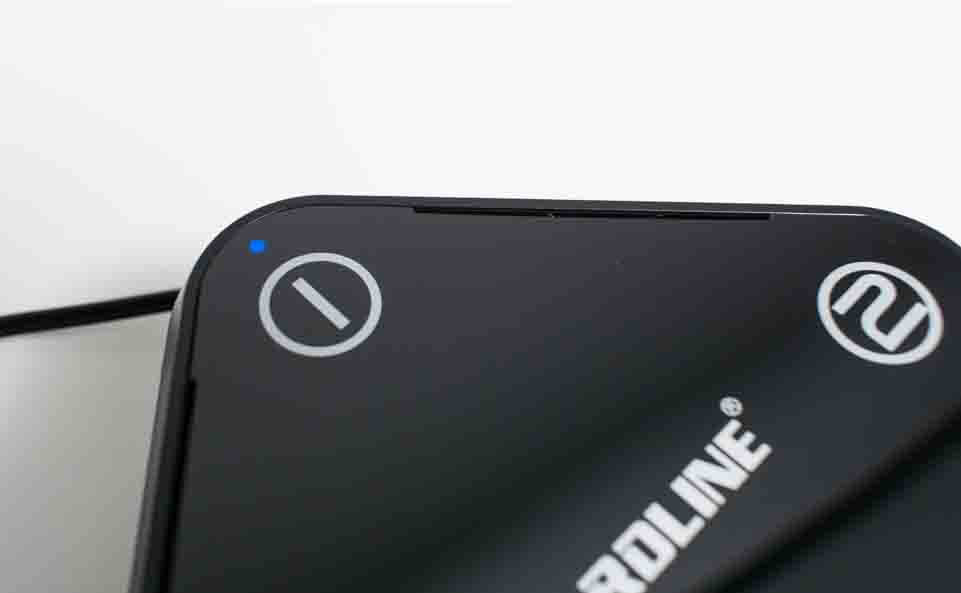
Note that you don’t need to have a large number of sensors in the system to benefit from this functionality. Let’s say you have only two sensors paired to the receiver. You can have sensor 1 assigned to zone 1 and sensor 2 assigned to zone 2. That way, when sensor 1 is activated, the zone 1 LED will light up on the receiver and the when sensor 2 is activated the zone 2 LED will light up. This allows you to have a visual cue on top of a unique melody that plays each time each sensor is activated.
Sensor zone assignment has other benefits as well.
If you do have a system with a lot of sensors it allows for much better organization within that system. Let’s say you have a large sprawling property which you can divide up into four zones – let’s say a front yard zone, a backyard zone, and a west facing and east facing zone. When you add a sensor to the system you can assign it to whichever zone you place it in. Let’s say you put your first sensor in the front yard zone (zone 1) and the second sensor in the backyard zone (zone 2). Now, when each sensor is activated the system will not only play a unique chime corresponding to each sensor but the receiver will also light up the corresponding zone number and you’ll know exactly in which general area the motion was detected.
Sensor zone assignment also greatly simplifies battery replacement within the system. When a sensor’s battery runs low the low battery indicator on the receiver will blink every 5 seconds. By following the procedure outlined in the GL2000’s user manual you’re able to check exactly which sensor in which zone is low on batteries. Systems that do not offer zone assignment functionality provide no means by which you can check exactly which sensor’s battery is low. Such systems usually have a low battery indicator like the GL2000 but you’ll have to check all the sensors in the system to determine which one is actually low on battery.
Note that the GL2000 was the only system we tested that features zone assignments for sensors.
Installation Difficulty
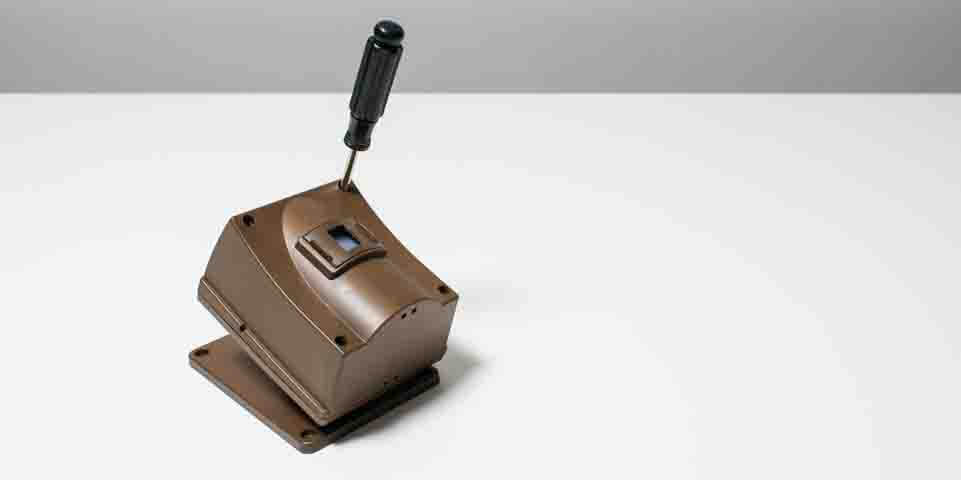
The Guardline GL2000’s installation was very easy. Guardline includes a highly detailed user manual and a quick start guide to help you through the installation process. The user manual should be read front to back if you intend to setup your system for maximum efficiency (with as little false alarms as possible). If all you want to do is install the system as quickly as possible you’ll only need to read the quick start guide. The guide only highlights the most important parts of installation and skips the fine tuning.
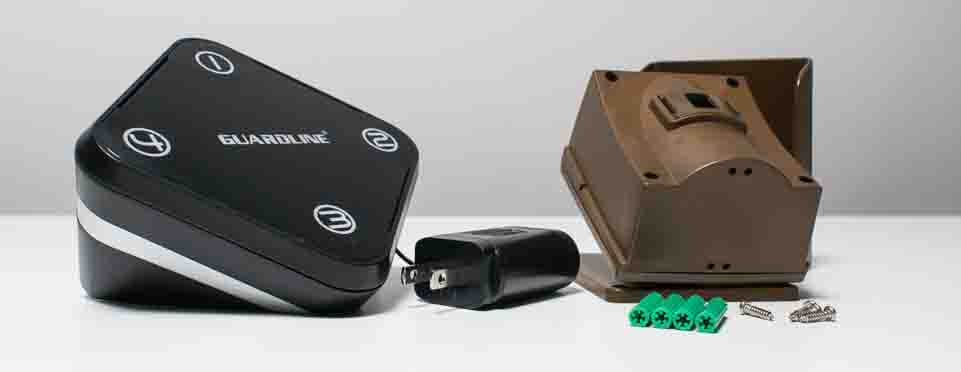
Guardline includes all necessary screws and accessories and even a mini screwdriver to make installation as pain-free as possible. But, they do not include any batteries which are required for the sensor to turn on and be able to detect motion. Batteries are not required for the receiver but they can still be installed as a backup (so that the system will continue to work during power failures) or if you want the receiver to be portable. Manufacturers not including batteries was a common occurrence for the driveway alarm systems we tested. Almost all these systems have sensors that only work with battery power and almost all of them don’t come with batteries.
Speaking of batteries, installation of the system involves four basic steps, the first of which involves, you guessed it, installing 4 AA batteries in the sensor (and 4 AAA batteries in the receiver if you so choose).
Four screws need to be removed from the front cover of the sensor in order to remove the cover and access the battery compartment. The included mini screwdriver can be used for this purpose.
After batteries are installed in the sensor and the receiver is plugged into AC power it’s time to pair the sensor to the receiver. This is accomplished quite easily by pressing a series of buttons on the receiver and waving your hand in front of the sensor. It is during this pairing process that you choose which chime to associate with the paired sensor.
The Guardline GL2000 also features a test button on the sensor which can be pressed to check whether the sensor is paired correctly. Pressing the test button will play the corresponding chime on the receiver to confirm successful pairing. If the chime doesn’t play you can be sure that the sensor isn’t paired correctly. Most other systems we tested do not feature a test button which means that you’ll have to activate the sensor by walking in front of it or having a car drive past it (if the sensor is set to only detect vehicles) to test whether it is paired correctly.
Installing batteries is the first step, pairing the sensor to the receiver is the second step, and mounting the sensor is the third step of installation. You will need to mark (using the sensor’s mounting plate as a template) then drill four holes before using the included screws to mount the sensor to a post or some other stable surface next to your driveway.
The sensor needs to be mounted at least 3 feet off the ground with the sensor eye pointing slightly downward. We recommend that you also point the sensor eye at an angle looking slightly towards your property assuming your driveway leads directly towards your property. You don’t want to point the sensor so that it sits at a ninety degree angle to the driveway.
The goal here is to point the sensor so that it looks towards the bottom and back of vehicles as they pass the sensor. The sensor is sensitive to temperature differences in the environment and pointing the sensor eye towards where a vehicle’s muffler would normally be located allows it to sense when a vehicle is passing even when the rest of the vehicle matches the temperature of the environment.
For example, let’s say it’s the middle of the summer and the vehicle that passes the sensor has sat in the sun all day. The whole body of the vehicle will then match the temperature of the environment which won’t allow the sensor to activate. However, the vehicle’s exhaust system will still be much hotter than the environment and thus making sure that the sensor can see that exhaust system will allow it to activate still.
The fourth and final step of installation involves testing that your system is operating correctly. Do you intend to only detect cars, only detect human beings, or have some other specific goal in mind? Test it! And if the system fails to work as you intended, you can always adjust the sensor, receiver, and your installation (specifically, how you mount the sensor) until it does.
That’s really the beauty of this system’s adjustability. While other systems leave you scratching your head and throwing your hands in the air when they don’t work as intended, the Guardline GL2000’s exceptional adjustability gives you options – it allows you to really fine-tune the system until you get it working exactly as you intend it to work.
General Ease of Use and Day to Day User Experience
The Chime
Most other driveway alarm systems on the market make a loud beeping sound when activated. The Guardline GL2000 is unique in that it doesn’t beep when activated. The receiver plays one of 32 different songs or sounds (what we generally refer to as “chimes”) instead. The songs have different themes. Some of them are Christmas themed and some are from movies. The sounds range from nature sounds (birds chirping, for example) to police siren sounds to traditional doorbell sounds to modern doorbell sounds.
Each sensor paired to the receiver can be assigned its own unique chime although multiple sensors can be assigned the same chime if you so choose.
The chime’s volume can be adjusted using a knob on the side of the receiver. At its loudest the chime can be upwards of 105 dB (with a sound meter placed right next to the receiver) loud. Turning the volume knob all the way down mutes the system.
Batteries
As we noted earlier, the sensor takes 4 AA batteries.
Real world battery life for sensor batteries will vary between 6 to 9 months. Battery life varies depending on these two factors:
- the type of battery used – rechargeable, lithium-ion, alkaline, etc.
- the frequency of traffic
The better the battery, the better the battery life. The more frequently the sensor is activated the lower the battery life.
The GL2000 does feature a low battery indicator light that will blink if sensor batteries are low. On multi-sensor systems you also have the ability to check exactly which sensor is low by following directions outlined in the system’s user manual. Other systems on the market do not allow you to do this. You’ll need to check each sensor manually to determine whether its batteries are low.
The GL2000’s receiver comes with an AC adapter but it does accept 4 AAA batteries also. When plugged into power the receiver won’t use the batteries. It will only switch to battery power when necessary – during power failures.
Durability, Warranty and Customer Support
Durability
Handling the GL2000’s sensor and receiver for a few days we didn’t notice any design or material choices that may affect the long term reliability of the system. Reading consumer reviews for this unit confirms these observations – there are very few, if any complaints regarding the system’s reliability.
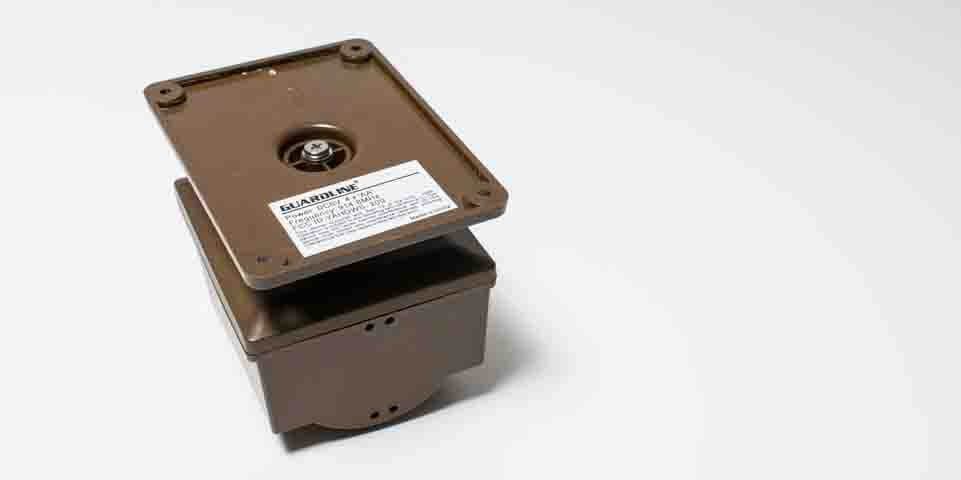
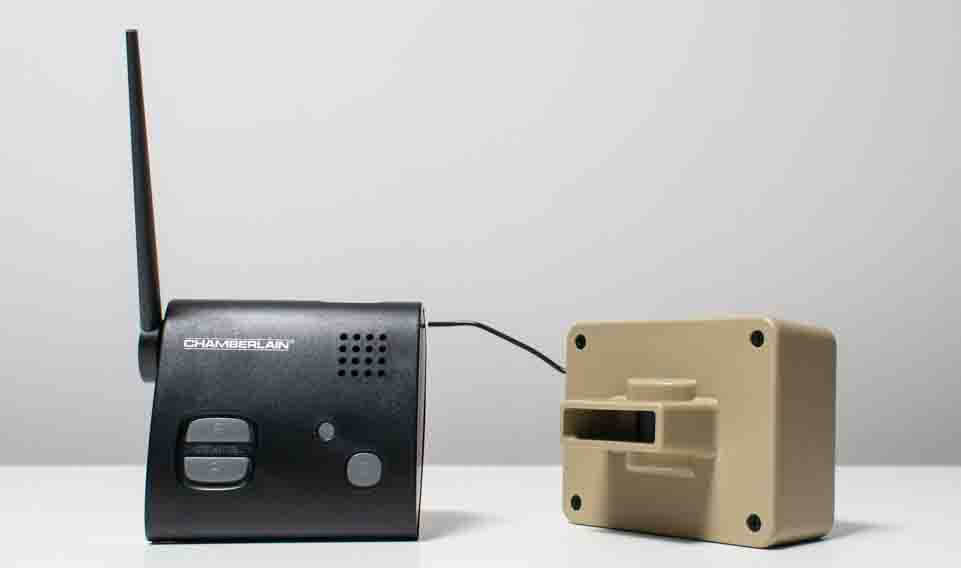
If you were to place the GL2000’s receiver directly next to the receiver of any other popular driveway alarm system you would immediately notice two things:
First, that the Guardline’s receiver is much larger and second, that it’s clearly made using higher quality materials than the receiver for the other system. Take a look at the photo below and you’ll see what we’re talking about.
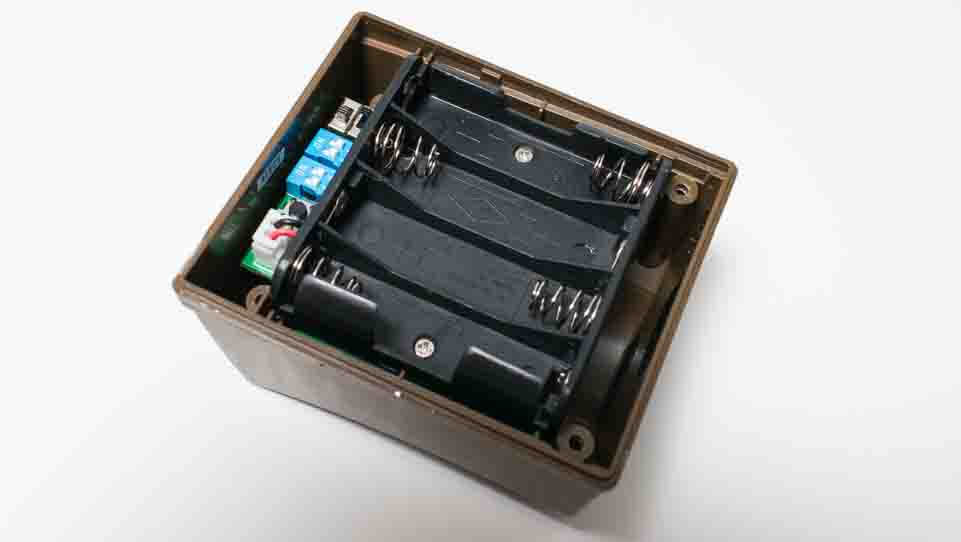
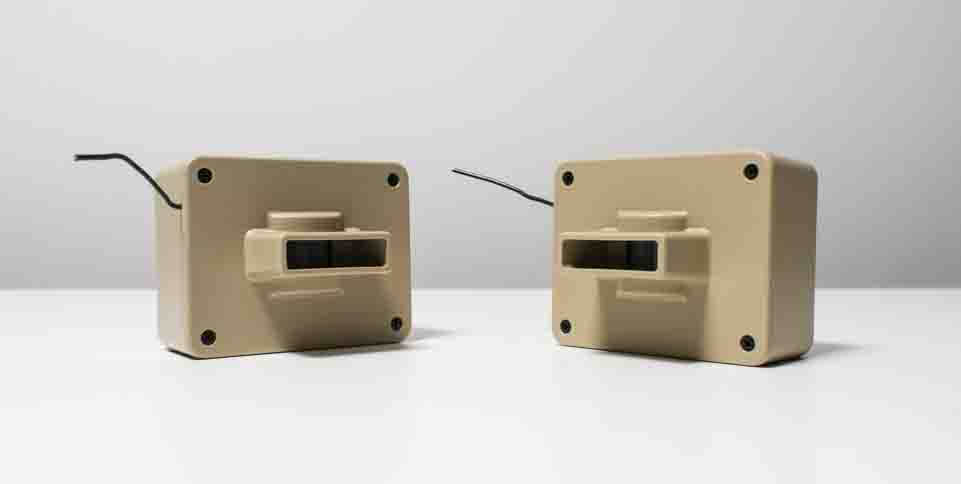
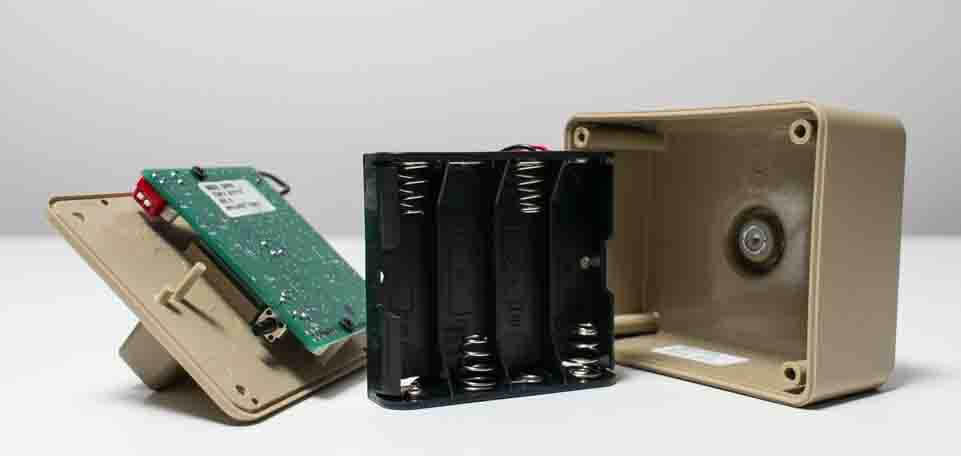
If you were to compare the Guardline’s sensor to those of other popular systems you would also notice a quality difference. See the photo below where we compare the Guardline’s sensor to the Chamberlain CWA2000’s sensor. Note how the Chamberlain sensor’s battery compartment hangs loose from the rest of the sensor assembly.
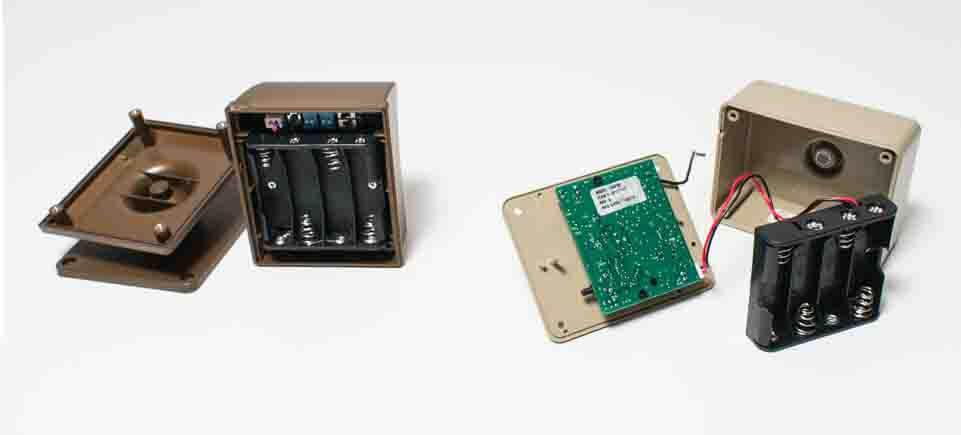
The GL2000’s sensor also features a hood to protect it from rain, snow, and light shining into the sensor eye and triggering false alarms. Guardline claims that the sensor’s operating temperature range is -4 degrees F to 140 degrees F.
Warranty and Customer Support
The GL2000 was the only driveway alarm we tested that comes with a lifetime warranty. Most other systems only come with a 1 year warranty.
Reading consumer reviews we didn’t find any complaints regarding customer support.
Conclusion
The Guardline GL2000 was the best driveway alarm we tested. It’s highly adjustable, which allows you to fine tune the system to detect only what you want to detect, thereby limiting the susceptibility of this system to false alarms. The GL2000 is also easily expandable – you can very easily add additional sensors to this system and when you do they’ll work together very well. With multiple sensors installed, you’ll be able to easily distinguish which sensor is activated - this was the only driveway alarm we tested that plays one of 32 different melodies instead of just beeping when activated – and each sensor you add to the system can be associated with one of these unique melodies.
Add on quick and easy installation, superior build quality, and the fact that this was the only system we tested that comes with a lifetime warranty and it’s easy to see how we chose the Guardline GL2000 as the best driveway alarm system on the market in 2020.
FAQ
No. The sensor will stay paired with the receiver.
The LED only stays illuminated while the chime is playing. If the chime is short in duration the LED stays on for a short time. If it’s a longer chime then the LED will stay on for a longer period of time.
Yes it will.
You will have to re-pair the sensor to the receiver. The melody that plays when the sensor is activated is selected during the pairing process.
The sensor isn’t waterproof but it is water resistant. If you submerge the sensor in water the water will be able to find its way inside the sensor and damage internal components. However, rain or snow falling on the sensor will not damage it.
Yes, it can. The receiver works just as well when battery powered, but the batteries won’t last long. Expect about 1 week of battery life if you don’t keep the receiver plugged into AC power.
We recommend mounting the sensor to a wooden post (like the one you’d use for a mailbox) but a tree, wall, fence or anything else with a stable surface close enough to your driveway will work just as well. Note that the sensor attaches to the mounting plate on a swivel so you don’t need to mount the mounting plate at an angle to have the sensor oriented at an angle.
Yes, there is a power switch on the side of the receiver.
Absolutely. But keep in mind that doing so will reduce the effective range of the system.
Chamberlain CWA2000
Range and Adjustability
Range
The CWA2000 has a very similar range drop off percentage to that of both Guardline systems we tested. However, it’s maximum manufacturer specified range - at ½ mile (2640 ft.) - is much greater, which means its actual obstructed range is greater also.
| Obstructions | Max. Range |
|---|---|
None |
Approx. 2600 ft. |
Minimal |
Approx. 1600 ft. |
High |
Approx. 1100 ft. |
If you need a system with a longer range than that of the Guardline GL5000 – recall the GL5000’s range with minimal obstructions was 800 ft. - then the CWA2000 is likely going to be your best option.
Adjustability
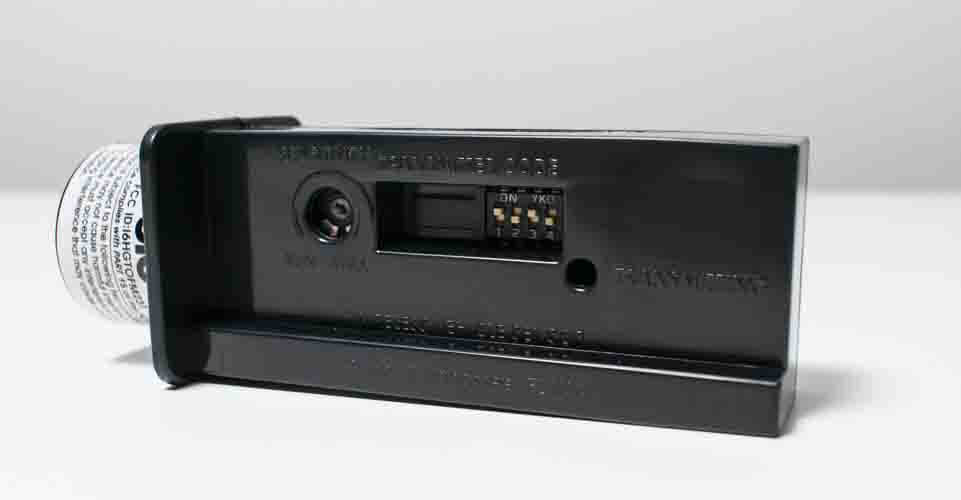
The Chamberlain’s sensor only offers two adjustments
Sensor sensitivity
can be set to high or low. On the high setting the sensor will detect almost anything that moves. On the low setting only large objects like cars, trucks and human beings should be detected.
Sensor range (detection range)
can be set to 15 ft. or 30 ft. It’s set to 30 ft. by default.
Compared to the top rated Guardline GL2000, the Chamberlain CWA2000 is much more limited with respect to adjustability.
That being said, it does have one setting – sensor sensitivity – that the Guardline GL2000 does not. The problem is that this setting doesn’t really work very well.
What exactly does high and low sensor sensitivity mean? Chamberlain tells you that this setting is set to high by default and that you should set it to low “to avoid unwanted detection of small animals”. We found that setting it to low often broke the sensor with it being unresponsive to even the largest objects moving right in front of it. Thus, the Chamberlain CWA2000 only really has one sensitivity setting that works reliably – the high setting.
The Chamberlain’s detection range can only be set to 15 or 30 ft. The Guardline’s detection range can be set to a much higher maximum range (39 ft.) and a slightly lower minimum range (13 ft.). It also features two additional range settings – 26 and 23 ft.
The Guardline features two additional sensor settings: Night mode which allows you to set it to only activate when it’s dark outside. And a speed setting which allows you to set the minimum speed that will trigger detection. The Chamberlain’s sensor doesn’t come equipped with either one of these two settings.
The Guardline’s receiver also features a myriad of different advanced settings not present on the Chamberlain’s receiver.
Expandability
The CWA2000 can be expanded to include up to 8 sensors. The Guardline can be expanded to include up to 16.
For the vast majority of users the Chamberlain’s 8 sensor limit won’t be an issue. However, it’s other multi-sensor limitations may very well be of some concern to you.
What are those limitations?
First, let’s talk about how the Chamberlain CWA2000’s receiver alerts you when different sensors contained within the system are activated. When you pair your first sensor to the Chamberlain’s receiver its activation will correspond to one beep on the receiver. When the second sensor is paired its activation will correspond to two beeps on the receiver. The third sensor that’s paired will make the receiver beep three times when activated and so on and so forth.
Here’s why this is a problem. Let’s say you have 5 sensors paired to the Chamberlain’s receiver. Now imagine a scenario in which sensor 2 is activated and sensor 3 is activated shortly after. The receiver beeps 2 times to signal that sensor 2 has been activated. It then beeps 3 times to alert you that sensor 3 has been activated. There is no delay between the first 2 beeps and the last 3 beeps because the two sensors were activated one right after the other.
You’re left scratching your head trying to figure out which sensor was activated. It could have been sensor 5. It could have been sensor 1 and 4. It could have been 2 and 3. You don’t know because all three of these scenarios will result in 5 beeps on the receiver.
Compare these potential headaches to what you’d experience with a Guardline system. With the Guardline GL2000 you can choose from one of 32 different melodies to associate with each sensor that’s added to the system. Thus, in the scenario above, the melody that plays for sensor 2’s activation would be entirely different than the melody that plays for sensor 3’s activation. The Guardline’s receiver would also light up the zone number that corresponds to the sensor that’s activated. You could have sensor 2 set to zone 2 and sensor 3 set to zone 3. If so, the zone 2 LED would light up for sensor 2’s activation and the zone 3 LED would light up for sensor 3’s activation. We talk more about zone assignments and their benefits in this part of the Guardline GL2000’s review above.
Installation Difficulty
In order to install the Chamberlain CWA2000 you’ll need to first put 4 AA batteries in both the receiver and sensor – batteries in the sensor are required while batteries in the receiver are not. Note that batteries are not included.
Next, you need to pair the sensor to the receiver. This is actually really easy with the Chamberlain system. All you need to do is press the LEARN button on the receiver and then press the LEARN button inside the sensor within 60 seconds.
Once the sensor and receiver are paired you need to close up the sensor housing. Four small screws are included for this purpose. However, the Chamberlain system does not come with a mini screwdriver like the Guardline system we tested. Don’t worry. It’s just a regular Philips head screwdriver so you’ll be fine using your own. Still, it would have been nice to see one included like it was with the Guardline GL2000.
The next step involves attaching the sensor to a mounting bracket and then attaching the mounting bracket to a post or wall next to your driveway. Interestingly, the Guardline GL2000’s sensor comes already attached to a mounting bracket right out of the box. The Chamberlain CWA2000’s sensor does not.
The final step requires that you test the system to see if it works. Wave your hand or walk in front of the sensor and confirm with someone inside your house that the receiver beeps when you do.
Is the CWA2000’s installation any more or less difficult than the other systems we tested? Not really. Installation difficulty is fairly standard for this system. The only notable exception is the ease with which the sensor can be paired to the receiver. This was definitely easier to do with the CWA2000 than it was for most other systems we tested.
General Ease of Use and Day to Day User Experience
The Chime
The CWA2000’s receiver beeps in a very generic way when activated. The beep sounds very similar to the beeping noise a microwave makes.
The volume of the beep is adjusted by pressing buttons on the top of the receiver. Each time you press up or down on the volume buttons the receiver will beep at the same volume as the corresponding setting.
Turning the volume all the way down mutes the system. Turning the volume all the way up, we measured the maximum volume of the system to be about 105 dB – more than sufficiently loud in even the largest single family homes – and a very similar loudness to that of the Guardline GL2000’s chimes.
Batteries
As we mentioned earlier, the system’s sensor requires 4 AA batteries to work. Depending on the type of batteries you use and how often the sensor is activated, battery life can vary between 1 and 2 years.
When the batteries run low the receiver will beep every 30 seconds to alert you that this is the case. Unfortunately, there’s no way for the receiver to tell you exactly which sensor has low batteries in a multi-sensor system. You’ll have to check all of them, one at a time.
While the receiver can run without batteries, we strongly recommend that you install batteries inside of it as soon as you set up the system. Should power go out in your home your driveway alarm system will not work unless the receiver can fall back to battery power.
Of the top 3 units we tested, both the Guardline and Chamberlain systems have receivers that can fall back on battery power. The Mighty Mule system we review next does not have a receiver that can run off battery power.
Durability, Warranty and Customer Support
Build Quality
The CWA2000’s build quality, for the most part, is about average compared to all the other systems we tested. Nonetheless, we did observe three potential problem areas during testing.
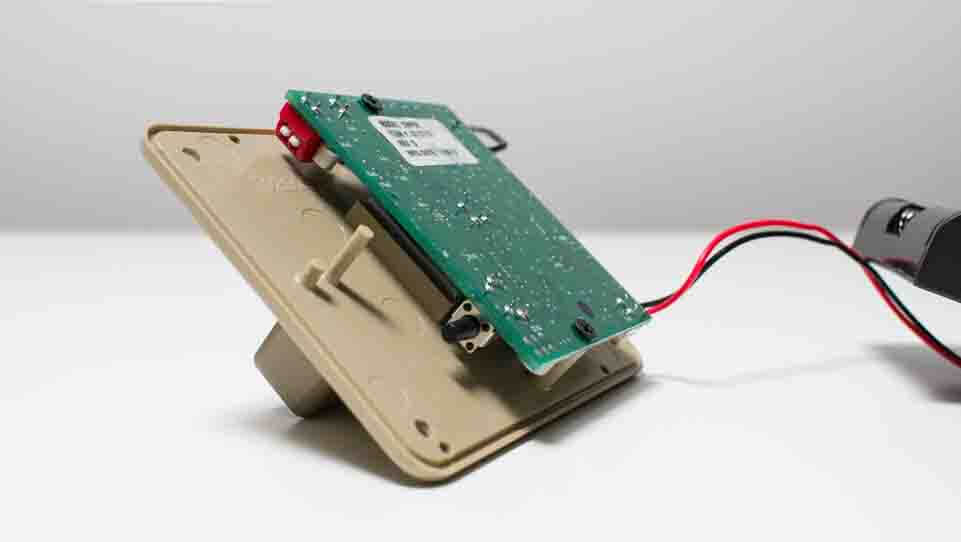
First, the sensor’s battery compartment hangs loose inside of it. Anytime you take the sensor apart and put it back together to replace batteries you’ll have to be very careful not to sever or damage the wire that attaches the compartment to the sensor, the compartment itself, or the PCB board on which it lies when you close up the sensor.
When you take the sensor apart and put it back together again you’ll also need to be careful not to damage the antenna wire that extends through the side of the sensor.

The third problem area lies with the receiver. We found it difficult to take apart the receiver to put batteries inside of it. A lot of force is required to do so and this force could potentially break the receiver’s plastic shell if you open and close the receiver enough times.
Warranty and Customer Support
The Chamberlain CWA2000 comes with a 1 year warranty. This is, of course, much shorter than the lifetime warranty included with the top rated Guardline GL2000, but fairly standard compared to most other driveway alarm systems on the market.
Chamberlain customer support is about average compared to that offered for other driveway alarm systems we tested for this guide.
asdf
Conclusion
We’ve been fairly harsh in our criticisms of the Chamberlain CWA2000 and this isn’t without reason. Testing the CWA2000 side by side with the Guardline GL2000 and GL5000 it’s clear that the CWA2000 is the inferior system.
It’s not nearly as adjustable, nor as easily expandable as Guardline systems. It’s not as easy to install and it’s build and the choice of materials and components used for its construction are definitely of a lower quality than that of both Guardline systems.
All of that being said it’s important to remember that the CWA2000 is designed to be a budget friendly system. It normally retails for less than half the price of even the cheapest Guardline system. It’s other most notable advantage, especially compared to the Guardline GL2000, is its superior range. If you need a system with a lot of range there’s no question the Chamberlain is the better option.
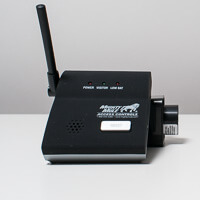
Mighty Mule FM231

Range and Adjustability
Range
The Mighty Mule FM231 is unique compared to most other driveway alarms we tested in that it doesn’t only consist of a sensor and a receiver.
Instead, the system consists of a sensor, receiver, and transmitter. The Mighty Mule’s sensor is installed underground next to your driveway. From the sensor extends a 12 ft. long wire that’s run to a transmitter placed above ground some distance away. This transmitter relays information it receives from the sensor to a receiver set up inside your home.
Up to this point we’ve only discussed driveway alarms equipped with PIR sensors. These sensors detect motion by sensing temperature changes. The Mighty Mule’s sensor doesn’t detect motion in the same way. Instead, it relies on magnetism. The sensor generates a magnetic field around it. It detects motion by sensing when a disturbance moves through this magnetic field. When this occurs the sensor sends a signal to the transmitter which sends a signal to the receiver. The receiver then beeps like every other receiver for every other driveway alarm on the market.
The FM231’s manufacturer specified maximum range is 400 ft. As was true for the other driveway alarm systems we tested, this range is greatly reduced in real world applications. Remember, even though its sensor works differently than a PIR sensor, the FM231’s transmitter still transmits signals via radio waves - and this type of signal is prone to interference. Our testing showed the following real world range for the FM231.
| Obstructions | Max. Range |
|---|---|
None |
Approx. 400 ft. |
Minimal |
Approx. 250 ft. |
High |
Approx. 200 ft. |
Do note that compared to PIR systems, the FM231 does give you greater flexibility with regard to placing the transmitter in a location with better line of sight to the receiver. In PIR systems the transmitter and sensor are one and the same so the transmitter has to go in the same location as the sensor. This location is often not the best spot for transmitting to the receiver.
Adjustability
The Mighty Mule FM231 isn’t a very adjustable driveway alarm system. The system’s sensor only offers one adjustment – sensor range, which can be adjusted from a 3 ft. to a 12 ft. radius.
The range is adjusted by turning a knob on the transmitter. Note that there are no markings around the knob to let you know exactly to which range you’ve set it to. You’ll have to approximate – for example, turning the knob halfway is an approximate setting of 7.5 ft. – halfway between 3 and 12 ft.
Expandability
Because of the way in which its designed, the Mighty Mule FM231 driveway alarm system offers limited expandability.
All that you can do to expand this system is to add receivers to it. You cannot add additional sensors, at least not in an efficient manner (the only way that you could add sensors is to buy a whole new additional system)
Installation Difficulty
Installation of the FM231 is much more difficult than it is for PIR sensor systems. Recall that PIR systems (for example, the Guardline and Chamberlain systems we discussed above) have only two components – a sensor and a receiver. The receiver is placed indoors and the sensor is mounted above ground outside.
The FM231 not only has an additional component to install – a transmitter – but it also requires you to follow more precautions and specific procedures during the installation process than what is required for installation of PIR systems.
Here is a short list of guidelines/precautions you’ll have to follow just in completing step 1 of installation - choosing where to place the sensor:
The sensor has to be placed…
- directly next to the driveway (within 2 ft.) and parallel to it
- within 12 ft. of where you want to install the transmitter
- in a location in which you can dig a hole 1 ft. deep and 1 ft. long
- at least 25 ft. away from roadways, neighbor’s driveways, and any other location that may see the movement of large metal objects
- as far away as possible from power transformers, power lines, and similar devices that may generate magnetic fields of their own
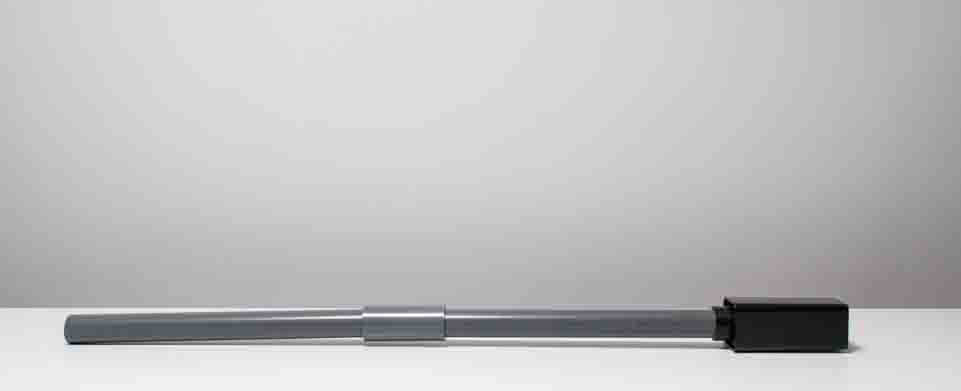
Once you’ve found a good location to bury the sensor you need to run a wire from the sensor to the transmitter. To do so you’ll need to create a small trench for it to lay inside. We strongly recommend that you run the wire through PVC conduit. You’ll need about 10 ft. of ¾” PVC pipe to do the job which is not included with the purchase of the alarm.
The wire ran from the sensor is plugged into the bottom of the transmitter. Three pieces of PVC are included that you stick into the ground and mount the transmitter to. The top piece fits perfectly into the bottom of the transmitter. With the PVC stuck into the ground to the correct depth the transmitter should be approximately 1 ft. above ground.
A few additional notes on installation
1. The transmitter takes 2 AA batteries which will run low and have to be replaced over time. This means that you’ll be removing the transmitter from the PVC pipe at least once every 1 or 2 years. When you remove it you don’t want the connected wire to unplug from it, so make sure you leave at least a few inches of slack in the wire when you run it from the sensor to the transmitter during initial installation.
2. Because there is only one transmitter per system there’s no need to pair the transmitter to the indoor receiver. However, it is important that you install batteries in the transmitter and still test the system before permanently burying the sensor, connecting wire, and PVC post for the transmitter.
General Ease of Use and Day to Day User Experience
The Chime
The Mighty Mule FM231’s receiver makes a standard beeping noise when the sensor detects motion. The volume of the beep can be adjusted using a dial on the side of the receiver.
Even on its loudest setting, this system’s receiver is not nearly as loud as that of the Chamberlain or Guardline systems we discussed above. With a sound meter placed right next to the receiver the highest reading we measured was 80 dB. Compare this result to 105 dB+ for both the Guardline and the Chamberlain.
Even though it’s not as loud as other systems, is this Mighty Mule system loud enough for you? That’s a difficult question to answer without knowing exactly the size of your home, where you want to place the receiver (in a central location or at one end of the home?), how much other noise is in your home, and so on and so forth.
Is it likely to be loud enough? We think so. You should only be concerned about the loudness of this system if you live in a very large home, have a lot of other noises in your home, and/or are hard of hearing.
Batteries
Most other systems we tested require at least 4 AA batteries to power their sensors. This Mighty Mule system doesn’t require any batteries for the sensor and only 2 AA batteries for the transmitter. Battery life is estimated to be between 1 and 2 years. Your mileage will vary depending on the type of batteries you use and how often the sensor is activated. Note that this system’s receiver does feature a low battery indicator to alert you when the transmitter batteries are low.
Unlike the top 2 systems we reviewed earlier, the Mighty Mule’s receiver does not offer battery backup. During a power failure the whole system will be deactivated – if the receiver has no power there’s no way for it to beep even if the transmitter and sensor work off of battery power.
Durability, Warranty and Customer Support
Build quality for this system is very close to average compared to the other driveway alarm systems we tested. As far as long term reliability is concerned, the primary area of concern with this system is the wire that connects the sensor to the transmitter. If you trench this wire without running it through PVC it’s very likely to be severed in one way or another within due time.
Like the PIR sensors of PIR sensor systems, the FM231 transmitter is water resistant but not waterproof. It will do just fine with normal rain and snow but should it be in the direct path of a sprinkler or get submerged in water it’s likely that it will get damaged.
The FM231 comes with a standard 1 year warranty. Consumers give Mighty Mule customer support mixed reviews.
Conclusion
There’s a lot not to like about the Mighty Mule FM231 driveway alarm, especially compared to the top rated Guardline GL2000 and even the second best rated Chamberlain CWA2000.
For one, it has a lower effective range. It’s less adjustable. It’s not a system to which you can easily add additional sensors. Installing the FM231 requires digging, trenching, and burying – none of these steps are required for installing the Guardline and Chamberlain systems. You also have to be very careful where you place the Mighty Mule’s sensor. You don’t have to be nearly as careful placing sensors for the Guardline and Chamberlain systems.
The Mighty Mule’s receiver doesn’t beep/chime as loud as receivers on other systems. The Mighty Mule system’s components are also not as well built as comparable components on top rated systems.
So why is it in our top 3?
We can sum up our answer with two words – false alarms.
Most driveway alarm systems on the market, including the top rated Guardline GL2000 and Chamberlain CWA2000, use PIR sensors to detect motion. These types of sensors sense motion as a change in temperature in the environment – a car, human, or animal, even a branch (which has a certain temperature) moves through or around in the environment and the sensor sends a signal to the system’s receiver.
Now, top rated PIR sensor systems, like the Guardline and Chamberlain systems, can be adjusted to only sense temperature changes within a certain range, moving at a certain speed, or at a certain size – all of these adjustments can greatly limit the frequency of false alarms. This is one of the biggest reasons why the Guardline GL2000 was selected as the best driveway alarm we tested. It is highly adjustable and should you make all adjustments necessary you can limit false alarms using this system to the point where they’re almost nonexistent.
But even with a highly adjustable system such as the Guardline, false alarms are still possible. This is an inherent quality of a PIR sensor system - false alarms cannot be completely eliminated. You can get to a very low percentage of false alarms – say less than 1% of all alarms sounded. But they can still occur and will occur within time.
This is where the Mighty Mule driveway alarm truly shines. If your goal is to only detect cars, trucks, and motorcycles then the Mighty Mule FM231 is the only driveway alarm on the market that will be able to make this type of detection with no false alarms. Moving branches, moving people, moving animals, a reflection of light – none of these things can possibly trigger this system. Only the movement of large metal objects will trigger it.
The system does of course have many limitations. It cannot be installed within 25 ft. of roadways. It cannot be installed near power lines, etc. But if it is installed in an accommodating environment it does work very well to do what it is intended to do.
Verdict
Our bottom line recommendations.

The top 3 driveway alarms we tested serve the needs of 3 very different types of consumers.
The Guardline GL2000 is the best overall option. It’s competitively priced for all of the features it provides. And those features are many. It’s the most adjustable system we tested. It’s the only system we tested that accommodates up to 16 sensors per receiver. It’s also the only system we tested that doesn’t simply beep when activated. You can choose from 32 different melodies to have the system play each time a sensor is activated. This goes a long way in your day to day experience using this alarm system. The Guardline GL2000 has other benefits as well such as easy installation, superior build quality, and a lifetime warranty.
The Chamberlain system is cheaper and has greater range but isn’t nearly as feature-rich as the Guardline system. It’s also not as well built and durable as the Guardline system.
The Mighty Mule system has a lot of weaknesses, at least compared to the two systems at the top of our list. But it has one major benefit that may override all of those weaknesses should that one benefit be enough of a priority for you. That benefit is its inherent quality of being impervious to false alarms. There is absolutely no risk of having false alarms with the Mighty Mule FM231 driveway alarm system.
Guardline GL2000
Get the Guardline GL2000 if you’re looking to buy the overall best driveway alarm on the market and you don’t need a system with a maximum range between the receiver and sensor of more than 300 ft. If you do, we recommend the GL5000 which is almost identical to the GL2000 but has a real world range up to 800 ft. (minimal obstructions).
Chamberlain CWA2000
Get the Chamberlain CWA2000 if you need a system with a greater range than what the GL5000 has to offer and/or if you’re looking for the best budget option. The Chamberlain system is less expensive than both Guardline systems and even the Mighty Mule system. It has a maximum real world range of 1600 ft. (minimal obstructions).
Mighty Mule
Get the Mighty Mule system if you only want to detect cars or other large vehicles passing through your driveway, if you want to be absolutely sure that you won’t have to deal with any false alarms, and if you don’t mind the difficulty involved in installing it.
Add a Comment
Have a question or comment? Let us know below.
Comments